
No products in the cart.
Since Halloween is just around the corner we’ve built and published a few projects in order to give some ideas to the DIY costume-inclined folks. One is DIY Halloween RGB LED Kitty Ears and two is Halloween LED Witch Hat.
So for this third hack we started with an online-bought robot costume, but being a creative tech people, we couldn’t resist making it better by using some brilliant LED strips that react to sound.
Supplies used:
- 3 x 5V RGB LED Stripxels WS2812B (30 per meter)
- 1 x 5V RGB Addressable LED strip, 1M (144 per meter)
- 1 x MEMS Microphone Board
- 1 x PJRC Teensy USB Board, Version 3.2
- 5 x Losi Micro-T MX2.0 2-pin connector set, wired
- 2 x Lithium Polymer Battery – 2000mAh (Lipo)
The Teensy was chosen because it has hardware based Fast-Fourier-Transform optimizations, and lots of memory.
The dense LEDs (144 per meter) were used on the helmet. More spaced apart (30 per meter) were used on the arms. All of them drive from one Teensy receiving analog signal from the microphone located in the helmet. The microphone captures both the voice of the wearer and ambient sounds.
Here’s what it looks like reacting to the music:
Technical Build:
The idea was to attach two denser LED strips to the face mask guard and the rest to the arms of the costume. They both would react to ambient sound and light up depending on the frequency of sound. The helmet’s strip would have the lower frequencies in the middle and the arms would have them start at the wrists.
The face mask guard took 52 LEDs per strip and arms got 25 LEDs per arm. These calculations are reflected in the code below.
For the arms, I divided each LED strip into two sections (since the costume itself had separate foam pieces for forearm and shoulder), and gave them their own battery. That allowed me to have a simple 2 pin connection for joining the arms to the helmet.
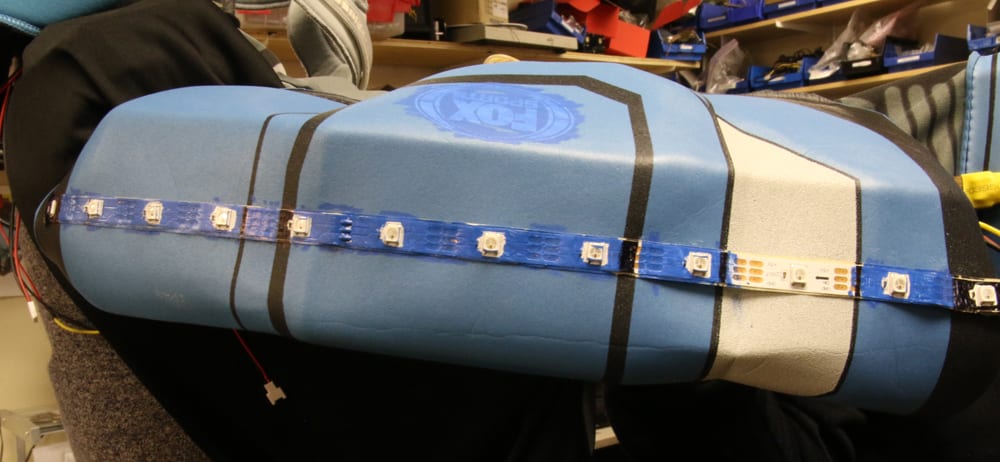
One problem when dealing with RGB Strips on wearables is that the solder pads are small and the wires break off too easily. I tried to minimize this by adhering a small wooden backing to the end of each strip. This acts like a cast and, when sealed with heat shrink, immobilizes the connections. I cut the supports on the laser cutter, but you can use anything. Popsicle sticks would work as well.

Here is the basic wiring diagram I used:
Wiring for Robot Costume
Software:
This code uses hardware support for FFT that’s built into the Teensy. If you want to use a different processor, you will need to add a FFT library and modify the code accordingly.
I found some code online that was almost perfect for this project. Rather than reinventing the wheel, I reused that code, and modified it for my needs. Original credit has been left in the code.
Summary:
With Halloween just around the corner, this costume should be a hit at any event.. I can’t wait to wear it!
photo credit Lucky Shot (David Luckman)
 Simple cosplay cat ears made out of Fosshape, decorated with rhinestones and complete with RGB LEDs for color changing effect.
Materials:
- Fosshape 300
- 2 x slow scroll RGB LEDs
- 2 x CR2032 coin cell batteries
- 2 x coin cell battery holders
- 100 flatback rhinestones
- 2 x hairclips
- fake fur
- steel ball chain
Tools:
- scissors
- heat gun/steamer
- glue gun
- needle and thread
Step 1: Cut out the paper template
Define the height you want the ear to be – by holding a ruler up to you head (highly scientific approach) – and build a triangle similar to shown. You can use these shown measurements as a guidelines – but your proportions might be a little different.
Adjust the shape to have the curves following a more natural outline of the ear. Cut out the paper triangles..
Step 2: Cut out Fosshape
Trace the template onto the Fosshape. Cut out 2 large shapes and 4 smaller shapes for the base of the ear (two bases per ear).
Step 3: Sew the ear parts together
Sew each ear shape to one base:
Step 4: Harden the Fosshape
Now shape and harden the ears using a steamer or heat gun. They will shrink about 1.5 times (left ear treated with heat and right one not yet shown for comparison), so take that into consideration when choosing the final product size.
Step 5: Attach the hair clip
Sew the second bottom to the ear and insert the hair clip. Heat shrink the bottom layer.
Step 6: LED
Insert the LED into the inside of the ear with legs poking out from the other side.
Step 7: LED Battery
Insert the legs into the battery holder so that the longer (positive) leg is closer to the outside.
Insert the battery (positive side facing out) – it should be very snug. If everything is done correctly, your LED should light up right away. If not, then readjust the LED legs until the light is on.
Bend the LED legs as shown above, kind of in a Z shape: 1st bend near the top of LED, towards the top of the ear, and second the opposite direction so that the whole contraption sits flat against the surface.
Stitch the holder down using the holes provided. Use some hot glue to secure the holder to the fabric if needed.
Step 8: Rhinestones
Now the fun part – use hot glue to attach the flatback rhinestones to the inside of the ear.
Step 9: Fur
Use small tufts of fake fur to disguise the bottom of the ear. Sew them in place.
Step 10: Finishing
Optional – use some cord/ribbon (in this case a ball chain) to finish the ear edges!
Solarbotics has worked on a good many interesting costuming projects, but few have been as unique as Shannon Chappell’s Rock Golem.
Shannon did a fabulous job repurposing electronics for the Golem, and if you’re trying to do the same, be ready for some major dumpster-diving.
Alternately, since we first worked on the Golem, we’ve been bringing in a variety of effects pieces that would have been very handy to have for this rebuild, like our hard-wire and SuperFlex LED strings for detail crack lighting, and solo WS2812B pixel LEDs for the crystal elements.
We’ve also since started carrying some wonderful costuming materials called Fosshape and Wonderflex which heat form and paint excellently, and would have been quite useful for some of the other structural elements.
As it was, we used a variety of our own in-house parts to retrofit Golem:
Lights in the crystals: Super Bright 5mm LED (SBLED)
All lighting driven by: Solarbotics Ardweeny (KARDW)
Double Rainbow RGB LED strip controller for Ardweeny (60170)
Jaw action powered by Servo S03N (Servo)
Arm, chest & groin tubes, lights in stone cracks: 12V Cold White LED Strip (60522)
FETs controlling the weapon’s light: ZVN2106 FET (TRZVN2106)
Initially inspired by the Moravian Star on Instructables and the fact that we now carry all kinds of 3D printing filament, we decided to make one of our own glowy holiday star. We have used this thing as source files to create a similar treetop decoration of our own.
After some trial and error (due to the Slicer not cooperating)…
…we printed a whole forest of perfect wintery spiky star-ends.
And, well, we just had to have someone live there for a bit. In this case, a snowman:
Our addressable 5mm LEDs were well suited to light this contraption. We drilled a hole in the bottom of each spike..
..to fit the LED’s domed part:
And then wired everything up. It wasn’t pretty but the WS2812 LED that we used made it much easier than a conventional RGB LED: rather than 3 separate channels, the WS2812 LED only has a data in and data out. Chain them all together and they work like a charm!
And here’s the final product, ready to light up our office with wonderful glowing lights!
Inspired by the Ice Bulb published on Instructables, we decided to create our own version. Ice bulb suggests that we use a balloon to shape the ice and before it freezes, add an LED so that it can glow. Since we decided to use a whole bunch of LEDs (on a string), we opted to use a silicon brownie mold for multiple “bulbs” in less conventional shapes instead.
If you decide to try this too, you will need wire cutters, wire, needle, silicone mold, and our 3 meter LED string of any colour (we chose a red-green-blue one). If you are wondering where to find the mold we used, you can find one at your local Michaels. If you can’t find a silicone mold, you can try using a metal muffin tin instead but this could cause your ice cubes to crack when they freeze.
Step 1. Cut seven wire strips, about 2″ long. They don’t need to be good looking, this is just for holding the LED string down to prevent it from moving around and make sure it freezes in the right position. We found that none of the sticky materials like gaffers tape or packing tape actually stuck to silicone, not to mention holding something in place, so wire will work the best.
Step 2. Bend the wires into a U shape – better to do it beforehand than trying to hold the unruly LED string in place with one hand, wire cutters in other, needle in the third one, and the wire to cut in the fourth. You notice the tendency, right?
Step 3. Do some math to space your LEDs evenly on the string. We decided that we wanted a 5 LED space between our ornaments and on both ends. That means (90-(5 x 7 spaces=35))/6= 9 LEDs per cell.
Step 4. Count out your LEDs for the first cell and wrap them in a loose ball like shown. Hold them in place, make a lead hole in the silicone with a needle and pin the LED string down with your U-shaped wire. Twist it in the back to keep the wire locked in place.
Step 5. Continue until you fill all the cells with the LED string. Make sure to adjust the string so it sits nicely in each cell and does not touch the edges or stick out of the mold.
Step 6. Fill the mold with water: the string is water/weather resistant. If you want the light to be more uniform within the star, cloud some cells with milk or cream (add just a few drops).
Step 7. Now that all the stars are ready, stick them in the freezer for a few hours until they are solid ice. The battery pack should be fine in the freezer as well but just make sure that it isn’t resting on anything wet.
Step 8. Take out your frozen goodies, power them on and enjoy!
You can also reuse the mold and make multiples – we made a red ornament as well.
I’m Dilan, a relatively new hire here at Solarbotics, and I am in charge of product development and R&D support. I’ve got tons of experience with many things, and have seen Arduino as a staple in many projects here at Solarbotics. With its ease of use, powerful programming language, and vast online community, it has been the go-to platform whenever a quick solution is needed. But when I needed some wireless communication, I’d choose a system like Xbee/Zigbee or even simple 433MHz modules, where the communication interface was still treated as a dumb serial link between the two systems. With Solarbotics’ use of Synapse, I needed to project to get to know a more advanced wireless system.
Solarbotics has been playing with Synapse SNAP modules, and have featured these modules in various projects in the past, like our our wireless Brutusbot and with a tutorial on how to get started with Synapse. This system has potential, and it was time to bend it to my will!
Yours truly is about to teach a mixed media class and wanted to try making some stamps to enhance my (and my students’) collaging experience. Stamps are used to create background patterns and give interest to surface design in 2d mixed media techniques. There is a variety of stamps available both online and in craft stores, but like many other craft products, they are quite expensive and only have a limited amount of generic designs.
So what do I do? Make my own! And having a laser at hand is, well, handy… If only I were to engrave some material deep enough for it to produce a print, and then cut it out, that would be a stamp! I thought of different materials, such as plywood, acrylic (which we have many scrap pieces of), and tried both. Although plywood has a distinct and pleasant woodcut look when stamped with, it was still too hard to produce a consistent print, especially if the surface has some raised areas already, as a mixed media work often would:Laser engravable rubber would probably be more durable and flexible, but I didn’t have any on hand (have yet to try it). What I did have was some foam similar to craft foam, in 4.6mm thickness (see pic at the right). This particular foam comes from an embroiderer’s supply and usually is used for creating 3D embroidery puff effect on hats, but it’s characteristics are similar to any other craft foam. It is most likely EVA (ethylene-vinyl acetate).The next step was to make sure my material was safe to put in the laser (anything containing hydrogen or vinyl chloride produces fumes that can damage both the inside of the laser and the health of the person breathing in the fumes). So we did the Beilstein test to make sure the foam doesn’t contain chlorides. The test consists of scraping the material in question onto a copper wire and burning it. In case chlorides are present the flame will have a distinct green colour. And it didn’t. Phew, safe to laser…
Now, onto designing. I came up with some of my own designs, but orname.net is a pretty cool resource with a lot of free designs available for download if you are into patterns. Well, I am, hence the reference. I found that for my foam pretty much any image can be raster engraved, with a detail not smaller than 1.8mm.Once the design is laid out, time to fire up some lasering goodness. For foam I used the following settings: raster 100 speed, 50 power; vector 100 speed, 20 power. I will raise the cutting power and/or slow down the cut next time around, because the beam didn’t quite penetrate all the way and I had to cut out the stamps by hand.
The foam material engraved beautifully, with enough raised edge to create a distinct print. The only limitation is size: the bigger the area, the more inconsistent the print will be, in terms of ink application and pressure on the stamp. I cut out an acrylic base to hold the stamp and attached it with Crazy Glue. The foam is probably less durable than laserable rubber that I mentioned earlier, but it holds ink well, washes off nicely and hopefully will stand up to some creative abuse!
Sometimes we get the opportunity to help out select people who are developing projects for a good cause. One of those things dear to our hearts is inspiring children with science and electronics. So when John Porter came to us looking for a hand to make a musical gear project as part of an exhibit at the Children’s Museum of Pittsburgh, we threw him some of our support. John attends Carnegie Mellon University in the Masters of Science program, and was working with fellow classmates Daniel Pfaff and Arden Rosenblatt to make a project described as “the ‘Musical Gear’. A single powered gear would exist at the center of a table. Children would be able to place Musical Gears on the table and mate them to the powered gear. Sensors on the edge of the Musical Gear would be triggered by coming into contact with the other gears. This would cause the gear to produce a musical tone on an internal speaker. By building up a chain of gears, the child would be able to create a variety of musical beats while learning about motion transfer through gears.”
They chose the Ardweeny as an ideal brain for the project – it proved to be compact and powerful enough to handle the behaviors they were after. “Once the brain of the Musical Gear was selected, the rest of the design quickly fell into place. It would be powered by a 9V battery through a linear voltage regulator. It would include the circuitry for a soft latch power switch so that it could turn itself off. A small audio amplifier was designed to boost the signal from the Ardweeny. We also selected a short range optical switch as the primary sensor on the gear, meaning there were no moving parts that could be broken.”
“Exhibit deployment was a great success. The gears were robust enough that not even the hordes of children were able to destroy them. Unfortunately, however, the musical beats that we had envisioned did not come to fruition. Instead, it was three days of chaotic, incessant beeping. The kids really seemed to enjoy it, though, even if we weren’t creating the next Mozart. And while we enjoyed our exhibit as well, we were certainly glad to pull the batteries out at the end. Maybe the world isn’t quite ready for the Musical Gear yet.”
John was kind enough to shoot and send some video our way which shows off what the gears looked like in motion as the kids played with them. I have to admit… I kind of really want to try it out myself.
Jerome, our squiggly-bearded intern from many moons ago that created the BeetleBot, just pointed us towards this totally pimpin’ pinewood derby car. The author from sliptonic.com shows how he made his sweet lowrider with hydaulic(esque) action by using a small micro-servo for each wheel, an Ardweeny for brains, and a 9V battery for power. The final effect is pretty amusing. Surely, the face of pinewood derby racing has been irreversibly changed forever. And for the better, we might add.
Well, we’re all back from Maker Faire, feelin’ pretty groggy but fairly alive (or, perhaps more accurately, undead – something about being in a zombie-like state sounds about right). So to break the recent drought of news posts, we’ve dug out a treat from the deeper regions of the Solarbotics server archives.