
No products in the cart.
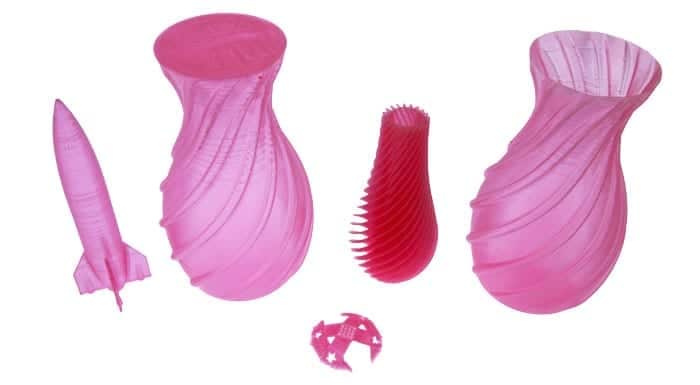 It takes a while to get to know all the quirks of your 3D printer and filament well. We thought we’d add to the knowledge base and share what we’ve learned about using the eSun 1.75mm PLA filament in Glass Watermelon Red on our Kossel Pro delta style 3D printer.

Grove Plant Care Kit is a smart automated solution for making sure the plant stays alive and well. The electronics monitor 4 different parameters necessary for the plant being happy and healthy: humidity, temperature, UV levels, and soil moisture.
From these variables it creates a watering schedule that will keep the plant at its optimal soil moisture levels. It will provide warnings on its display when UV levels are too high or when temperature is out of bounds between it’s cold and hot set points. With its built in pump and flow sensor, it can water the plant autonomously down to the milliliter.
I created this choker as a project to demonstrate the new MicroNova APA102-2020 LED strips. 
Photo by Yeti, edited by Batgirl
These addressable LEDs are extremely small, less than 1/4 the size of a standard 5050 LED.
This project was built using engineering sample standard MicroNova 99 LED / meter strips . The MicroNova strips we are selling have 198/meter – twice the density!
Reason for a Choker necklace:
Hats have been done, shoes have been done, pendants have been done.
This is something new for a Valentine’s dance costume, so I decided to go with a choker design. I also wanted something that was interactive, something that would add another layer of WOW to just lighting.
Build:
I used a Wemos D1 Mini development board along with a boost-converting battery shield for the Wemos D1.
The battery shield was a particularly good choice here because the MicroNova LEDs should be supplied a solid 5VDC. This board boosts the battery voltage to 5V, and then the Wemos D1 Mini bucks it down to 3V3 for it’s own operation.
A mini SPDT Slide switch toggles the power from the battery shield to the D1. This allows charging the battery using the battery shield USB connector while not powering the D1.
Epoxy locks the switch and wires in place.
The battery used is a conveniently handy older 450mAh Lithium Polymer. Depending on the lighting mode, this battery can power the necklace for a couple of hours.
I used elastic thread to attach the LED strip and components to the necklace. A heavy duty needle was all that was needed to punch through the (imitation) leather belt. Because the thread was elastic and tied under tension, it held the MicroNova strip well in place.
Operation:
When the choker powers up, it creates a WiFi Access Point called “HeartBurnChoker1”.
Once I connected to this WiFi, I opened a browser and went to 192.168.4.1. The control interface is simple, but effective. The D1 Mini has more than ample power and speed to effectively drive these LEDs. The MicroNova features separate clock & data lines, so even relatively slow I/O (like Raspberry Pi) can still make it work.
I created this choker as a project to demonstrate the new MicroNova APA102-2020 LED strips.
Photo by Yeti, edited by Batgirl
These addressable LEDs are extremely small, less than 1/4 the size of a standard 5050 LED.
This project was built using engineering sample standard MicroNova 99 LED / meter strips . The MicroNova strips we are selling have 198/meter – twice the density!
Reason for a Choker necklace:
Hats have been done, shoes have been done, pendants have been done. This is something new for a Valentine’s dance costume, so I decided to go with a choker design. I also wanted something that was interactive, something that would add another layer of WOW to just lighting.
The Build:
I used a Wemos D1 Mini development board along with a boost-converting battery shield for the Wemos D1.
The battery shield was a particularly good choice here because the MicroNova LEDs should be supplied a solid 5VDC. This board boosts the battery voltage to 5V, and then the Wemos D1 Mini bucks it down to 3V3 for it’s own operation.
A mini SPDT Slide switch toggles the power from the battery shield to the D1. This allows charging the battery using the battery shield USB connector while not powering the D1.
Epoxy locks the switch and wires in place.
The battery used is a conveniently handy older 450mAh Lithium Polymer. Depending on the lighting mode, this battery can power the necklace for a couple of hours.
I used elastic thread to attach the LED strip and components to the necklace. A heavy duty needle was all that was needed to punch through the (imitation) leather belt. Because the thread was elastic and tied under tension, it held the MicroNova strip well in place.
Operation:
When the choker powers up, it creates a WiFi Access Point called “HeartBurnChoker1”.
Once I connected to this WiFi, I opened a browser and went to 192.168.4.1. The control interface is simple, but effective. The D1 Mini has more than ample power and speed to effectively drive these LEDs. The MicroNova features separate clock & data lines, so even relatively slow I/O (like Raspberry Pi) can still make it work.
Video of the Collar in Action
Every year a group of my friends have an engineering Secret Santa. The rules are simple: make something cool for under $20 that requires engineering to complete. In years past we’ve seen Google cardboard VR headsets that are 6DOF, match stick rockets, 3D printed fans that explode when used, 3D printed rockets with cardboard launch controls, and a host of other semi dangerous, partially completed projects that are more than a little interesting.
This year I decided to create a portal device from the Popular Adult Swim show Rick and Morty. The device opens portals from one dimension to another by spinning a knob to select the target dimension number on a 7-segment display. With a background in electrical engineering, I thought that this was an excellent project to start tinkering on! Plus, the 3D printer needed a workout.
Parts List
• 1x Rotary Encoder
• 1x 7-Segment Serial Display
• 4x 10mm Green Diffused LED
• 1x 4.5m Green LED String
• 1x 2xAAA Battery Holder
• 5.0V Micro Boost Regulator
The Build
I based this build on Sparkfun’s 7-Segment Serial Display, which has the desirable feature of being designed around the ATmega328P, a.k.a. the Arduino chip. I replaced the stock library that controlled the 7-segment display with my own, allowing me to use the excess power to control my project’s logic flow.
To mimic the functionality of the portal device in the show, I combined the 7-segment display with a rotary encoder. I used a library online to read the grey code of the encoder and turn it into a basic clockwise/counter clockwise selection knob. The encoder’s wheel also acts as a button for simple spin/set operation (seen above, showing the default dimension, C137).
Power comes from a simple AAA battery pack with built-in on/off switch & pre-tinned leads soldered to a small 5V boost converter used to power the 7-segment, processor, and LEDs.
Although there are 3D STEP files online, I designed up my own implementation of the portal device in Solidworks before printing them on our Kossel Delta 3D printer. The CAD files need polish before we release them to a 3D repository, and we’ll update the blog entry when they’re available.
The large 10mm green LEDs round out the effects nicely. LED voltage drop calculations showed wiring them up 2 in series, 2 in parallel for a nice green glow without requiring current limiting resistors.
To enhance the glow to the top tube, SuperFlex LED strings were wired directly to the 3V battery source and stuffed unceremoniously into the tube. And as with all quick DIY projects, everything was assembled into the portal device with superglue.
The last step of the build was to add a little door at the bottom of the portal device so that the battery pack can be accessed.
Although not quite perfect, it turned out rather well considering I only had two sleepless nights to get it ready. Revision 2 requires adjusted CAD files, a wiring schematic, and better matched tube/front LED colors.
C’mon Morty – there’s something I need you to do….
Every year a group of my friends have an engineering Secret Santa. The rules are simple: make something cool for under $20 that requires engineering to complete. In years past we’ve seen Google cardboard VR headsets that are 6DOF, match stick rockets, 3D printed fans that explode when used, 3D printed rockets with cardboard launch controls, and a host of other semi dangerous, partially completed projects that are more than a little interesting.
Now that the season of mass gift giving is (temporarily) over, publishing the details on this special gift ocarina box for a wedding anniversary will not ruin a surprise. So I figured I’d share this personal project that uses simple but smart electronics.
First I soldered an interrupter switch to the SuperFlex LED Strand with Battery Pack in color purple.
I wanted the drawer that houses the ocarina to be rectangular in shape but also wanted the overall box to be circular. I compromised between the two requirements by making the box a semicircle that looked like a capital “D”.
This shape also allowed me to hide the battery pack behind the drawer which was quite convenient!
I attached two laser cut tabs with #4-40 screws to the inside of the box.
They are serving as a stopper to the small lid that will host our battery pack.
Inside view of a battery pack platform.
Another set of #4-40 screws holds the cutout lid on the outside. The battery pack is glued onto it and can be easily accessed for changing batteries or troubleshooting.
Looks neat and concealed.
I attached the interrupter switch right with some #2 thread forming screws at the point where the drawer will sit when fully closed.
This way the LED string will only light up when the drawer opens, releasing the switch, and lighting up the contents of the gift box.
Here is the switch installed in a small cutout in the drawer’s containing walls.
The LED string is threaded through a small hole in the back wall of the drawer. A small amount of extra length is stuffed between the containing wall and the back of the drawer so that when the drawer is opened, it does not pull on the LED string.
Now to the decorative part. For the lattice cutout I Google-searched and downloaded a nice vine pattern that I auto-traced in CorelDraw to make it a vector. I tweaked it by bringing the design elements closer together to increase stability, since the pattern is quite delicate. For the final design of the top lid I added a solid circle with text on it (a small quote from our wedding vows). I then laser cut out the vine design and lightly vector-engraved the text in the circle.
To complete the lid top I attached heavy purple card stock from a craft store underneath using a bit of white glue.
The kerf pattern that covers the semi-circular portion of the box was also found online. Every sixth point is slot-and-tab’ed into the top and bottom lids to ensure smooth curvature while maintaining stability.
The whole assembly is done using predominantly white glue – here are the lid layers stacked and pressed together for drying.
The front of the drawer repeats the same pattern as the top, but this time engraved instead of cut through. The crystal knob was found at a local craft store.
And here is the finished product, the intricate vine pattern adds complexity and dimensionality, the light golden wood grain stands out great against the opulent purple backdrop, and the LEDs inside illuminate and highlight the gift.
P.S. The final version added paper straw stuffing that helped to diffuse the light and provide extra cushioning for the fragile ceramic ocarina.
Now that the season of mass gift giving is (temporarily) over, publishing the details on this special gift for a wedding anniversary will not ruin a surprise. So I figured I’d share this personal project that uses simple but smart electronics.
The idea of adorning oneself with glowing bits has been around forever, but instead of smearing ourselves with phosphorescent jellyfish or placing fireflies in ears like some uncivilized cavemen we went for simple LED earrings. We made a build that involves a simple slow-scroll RGB LED and a few reflective bits to bounce that pretty light around for a shiny ear decoration. It is powered by a lightweight coin cell battery integrated into the design eliminating the need for wires. In order to conceal it, we used this brilliant idea by Idunn Goddess to utilize plastic googly eyes that can be found at any dollar store. The benefit of this method is that the battery can be removed and/or replaced once it is worn out or you want a break from being shiny allowing for more than one-time use.
(more…)
The idea of adorning oneself with glowing bits has been around forever, but instead of smearing ourselves with phosphorescent jellyfish or placing fireflies in ears like some uncivilized cavemen we went for simple LED earrings. We made a build that involves a simple slow-scroll RGB LED and a few reflective bits to bounce that pretty light around for a shiny ear decoration. It is powered by a lightweight coin cell battery integrated into the design eliminating the need for wires. In order to conceal it, we used this brilliant idea by Idunn Goddess to utilize plastic googly eyes that can be found at any dollar store. The benefit of this method is that the battery can be removed and/or replaced once it is worn out or you want a break from being shiny allowing for more than one-time use.
Supplies needed:
2 slow scroll RGB LEDs
2 googly eyes that fit the battery well – we used 2cm diameter eyes
2 coin cell batteries that fit inside the eye – in this case 3V ECR1616
2 earring hooks
Crazy glue
Scissors or exacto knife
Needle
Drill press with metric M5 drill bit or hand drill
Something to diffuse the light – we used plastic crystals from, you guessed right, Dollarama
Building Steps:
Googly eye prep:
![]()
Cut an opening that will fit your chosen battery’s diameter and take out the circular bit that was pretending to be a pupil or an iris. You won’t need that fake, lying piece of plastic ever again.
Poke 2 holes for LED legs with the LED legs on the opposite side of the battery slot. They eventually will become one hole, but that is not important.
![]()
Poke a hole in the googly eye backing next to the battery opening and thread the earring hook through.
![]()
Embellish and/or paint the front of the googly eye to conceal the battery. We glued some flatback rhinestones for added shine. No one needs to see the inner workings of this earring – it should glow by magic only.
![]()
![]()
Drill the hole of the right diameter to fit the LED dome in the plastic crystal and glue the LED into the diffuser. In the above photo, the opening for the LED wasn’t deep enough. We were lazy. But that doesn’t prevent the light from bouncing around the chandelier nicely, as you will see in a bit.
Final assembly:
![]()
Insert the battery and the LED as shown. If the polarity is correct, your LED will light up. You can carefully glue the base of the LED to the battery container. Or you can do it recklessly and then you will have an ocean of crazy glue solidify over the battery making it impossible to replace.
As an option, you can sandwich two coin cells for added brightness and longevity. They still fit into the holder just fine.
![]()
Tip:
If you are not fond of fishing a slippery coin cell out of the holder every time you want the LED off, you can cut out a small plastic tab to place between the LED leg and the battery. This will create a break in the circuit and preserve battery life. Talk about energy saving.
Final look.