
No products in the cart.
K1 and K1 MAX Printer Overview
Click on the images to enlarge.
Creality K1:
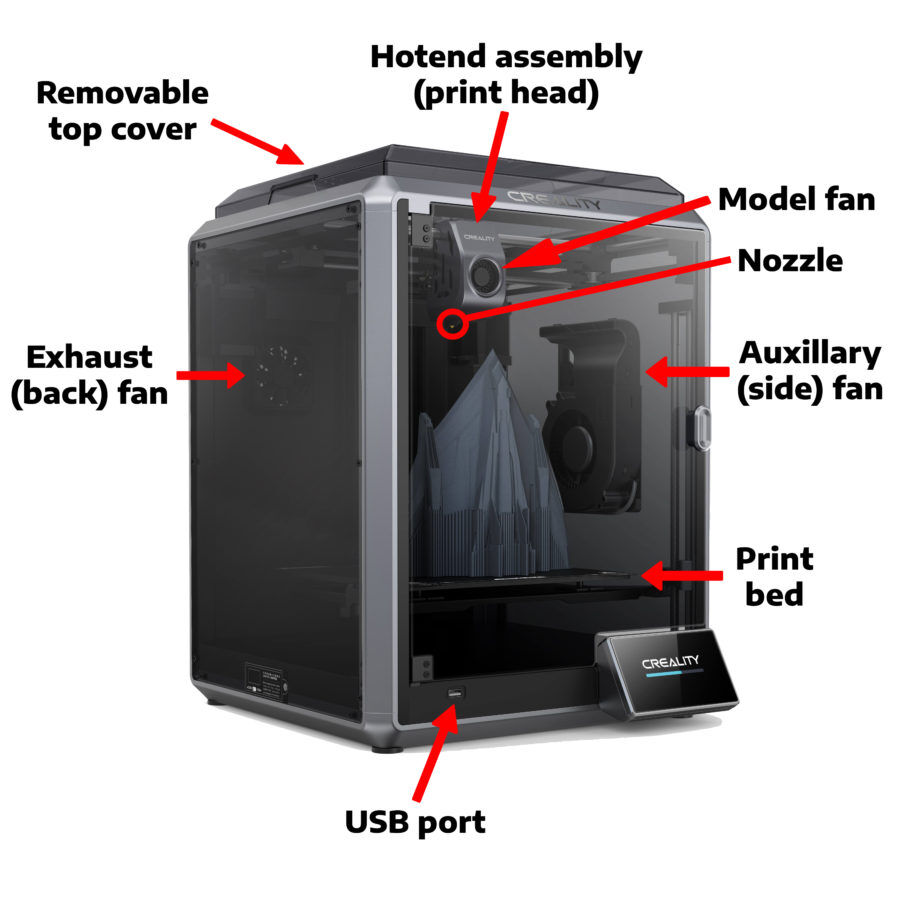

Creality K1 MAX:


Creality Print Configuration
For preparing files for the K1 and K1 Max, we currently recommend using the software Creality Print. It is available to download from the Creality Website. Creality Print was made for the K1 and K1 Max and includes some machine specific features not available in other slicers (such as Cura). Setting up the K1 and K1 Max with Creality Print is easy as the software contains all the needed profiles and machine definitions with the install.

Make sure to select English as the language and North America as the locale.
Select the appropriate printer, either the regular K1 or K1 Max.
When setting up your machine, make sure to choose the 0.4mm nozzle if given a choice. Both the K1 and K1 Max will come with a 0.4mm nozzle standard.
You can edit parameters such as layer height, infill percentage, temperatures, and support settings by clicking on the edit button on the right hand panel inside Creality Print. You can also save these changes into new parameters by clicking on the + button.
K1 and K1 Max Cura Configuration (Deprecated)
K1 and K1 MAX Cura Configuration
If possible, try to use Creality Print instead of Cura as Cura will not be able to utilize all the features of these machines. It is approved by the CBE and is available in the download repository.
Start by downloading the file below and opening Cura on your computer.
If you have used Cura before and have a machine set up already, ignore the steps to add a machine and skip to importing the profiles below. Otherwise, follow the first time setup when you open Cura and add a ‘Non-Ultimaker Machine’. Scroll down the list and choose the Creality CR-10. This is only needed temporarily so just click next until the machine settings go away.
Importing the machine profile
To import the K1 and K1 Max profiles start by dragging the ‘K1+highqualityCura.3mf’ file within the zip folder onto Cura. It’ll prompt you to either open the project or import the files, click on open the project. You should have a screen appear like the one on the left. Click ‘Open’. If everything goes well, you should now have the Creality K1 as a machine in the left drop down menu and the Creality K1 PLA (High Quality) profile as shown below. Repeat this process for ‘K1Max+fastCura.3mf’ but make sure not to override the previously imported profiles if given the option. After you should have both the K1 and K1 Max as machine options along with a normal and fast profile. This method usually works but may require some manual configuration depending on the version of Cura. After the setup is complete, you can remove the CR-10 from Cura.
K1 and K1 MAX menu guide
Home screen
Purple box: Main menu selection. Tap on one of the 5 icons to change screens. From top to bottom you have home, manual inputs, files, settings, and info.
Red box: Temperature selection and readout. Tap on either the top or bottom icon to set the temperature manually for the nozzle and bed respectively.
Blue box: Chamber temperature. Not adjustable, just shows ambient temperature. Useful info for some harder to print filaments, try to keep below 40°C for PLA when possible.
Yellow box: LED light control. Tapping this turns on and off the chamber light.
Pink box: Shows wireless connection status (currently disabled) and filament run-out state. The icon shows up if you do not have filament loaded and goes away when you do.
Green box: Fan control. Tapping this takes you to the cooling page (more info later on this).
Manual Inputs screen
Purple box: Sub-menus. Allows for extra pages on each screen.
Red box: Temperature selection and readout. Same as the home screen instructions.
Blue box: *New for update 1.3.3.5* Speed control, allows you to adjust the speed of the machine while in operation to slow or speed prints up.
Older firmwares: Chamber temperature. Same as the home screen instructions.
Teal box: Disable motors. Tap this to disable power to the motors.
Pink box: Jog controls. Allows for manual movement of the print head and bed. Looking at the printer from the front, X- is move left, X+ is move right, Y+ is move backwards, Y- is move forward. Z⬆ raises the bed and Z⬇ lowers it.
Brown box: Jog distance. Changes the distance each tap on the jog controls will result in.
Extrude / Retract page: Allows manual extrusion and loading (extrude) / unloading (retract) of filament from the machine. Set the nozzle temperature slightly higher than the standard printing temperature for the loading / unloading of filament.
Note: You will need to push the filament through the tube until it reaches the extruder gears on the head of the printer. Same with unloading, it will only unload a short distance automatically.
Cooling page: Allows for manual speed control of the fans. The model fan is the fan on the head of the printer, the side fan is the big auxiliary fan on the right side of the case, and back fan is the exhaust fan. These can be overridden when a print starts with the settings in the slicer.
Files screen
File selection for starting prints. The local page is for files stored to the memory of the machine, USB drive will show the files on a plugged in USB stick, and history displays past jobs, time to complete, and if it was a success or not.
To start a print, simply tap on the file and select print.
To delete files, tap and hold anywhere on the screen. Then tap on the individual files you want deleted and you should see a green check showing your selections. The click delete.
Note: Creality Print is currently the only slicer that includes the preview images. If you are using Cura, no images will appear however the file should print fine.
After selecting your file, you will be presented this screen to confirm printing and give you a chance to verify some settings. It is recommended that you keep calibration selected, it will add some time to each print but will reduce the chances of print failure. At a minimum, keep calibration on for the first print each time after the machine is turned on.
Settings screen
Most of these settings are not important or are self explanatory. The important ones are:
Yellow box: This opens the self-check calibration page pictured below.
Root account information: The info presented here will not be correct. Each machine will have it’s root password changed before delivery for safety reasons.
Self-check calibration page: Allows you to have the machine run through a number of automatic calibration routines.
Input shaping: The K1 and K1 MAX are so fast they need vibration compensation to reduce ringing on prints. Ringing is undesirable and like an echo of movements made that shows up in the print. During the input shaping process the machine will vibrate and can potentially get quite loud. This is normal and expected while tuning. Do not touch or bump the machine while running the input shaping calibration.
Auto leveling: If prints don’t have a nice base layer or come free of the print bed during printing, you may want to run the auto leveling. The printer has no manual adjustment for leveling or Z offset, it is all automatic. *New for 1.3.3.5* You can adjust the offset in software under the expert mode menu (explained later).
(Settings screen cont.)
Reset to default: DO NOT use this function. Please contact us at Solarbotics if there are any issues you think may be resolved by resetting the device.
*New for update 1.3.3.5+*
Red box: Expert mode, leads to the following menu. If you are unsure of what you are doing, do not change any of the options in this menu as it can lead to potentially damaging the machine. The first 2 options can only be modified while a print is occurring.
Z Offset: If your prints are always too high or too low, you can set a manual offset here. Only change this if it is consistently only high or only low, as if it changes between the two it could cause the nozzle to damage the print bed.
Flow: How much material is actually extruded from the nozzle vs what it thinks it should extrude. A flow of 100% is nominal, a lower flow can be set if the machine is over-extruding or a higher flow can be set if there are gaps in the print (however this could also be a blocked nozzle).
Nozzle PID calibration: If your temperature graph on the first page looks more like a roller coaster than a flat line when it reaches temperature, you may want to run a nozzle PID calibration. This teaches the machine the thermal properties of the hotend to stop it from over-running and under-running temperature. When prompted, choose the temperature you most often print at for best results.
Network page: Used to connect the printer to a wireless network.
Camera page: Allows for camera settings to be modified. The K1 MAX comes with a camera while the K1 has an easy to install module that is purchased separately.
AI function: See below. Note: All AI functions are still in their infancy and, while they haven’t caused us any issues, could cause trouble. If you run into issues with any of these enabled, try disabling them temporarily to see if the issue persists.
AI detection (camera required): The machine will attempt to spot signs of failed prints such as fallen objects or filament spaghetti.
First layer detection (K1 MAX only): Uses the integrated LiDAR module to check the area where it expects the first layer will be. If something doesn’t appear correct or if it thinks the print will fail, it will warn you or pause the print depending on your selections.
Motion advance (K1 MAX only): This compensates for the pressure inside the nozzle so that when you want to stop extruding no extra filament continues to ooze out. This helps increase print quality at high speeds. The printer will make a extra test pattern before a print and scan it with the LiDAR module to compare different values of motion advance to find the best for your machine.
Note: All AI functions require the use of Creality Print software to work and, while they haven’t caused us any issues, could cause print issues as they are under development still. If you run into issues with any of these enabled, try disabling them temporarily.
Info screen
FAQ and online manual both show a QR code to scan with your phone.
Error history: keeps track of any issues the machine may have experienced. If you need technical support from Solarbotics, providing us with an error code can sometimes help in figuring out a solution.
K1 and K1 Max Maintenance
Both the K1 and K1 Max have basic maintenance that should be done on occasion. Aside from keeping the interior of the printer clean and free of debris you should also:
- Run the printer through its self-checks every few weeks and if you ever move the machine to a new location.
- Clean the print bed with isopropyl alcohol when required.
- Check to make sure the cable chain is in good condition and all the links are still connected.
- Heat up the nozzle and use included snips to remove any filament buildup around the nozzle.
- Check inside the stopped fans for any filament strands / bits and remove with a pair of tweezers or pliers if possible.
- Lubricate the Y axis rods and Z axis rods / screws every 500 hours of printing time. Usually this only needs to be done once or twice a year but if you notice the printer is louder than usual while moving on the Y axis, check the rods and if the lubricant is very dirty or dry, re-apply a small amount. The K1 Max comes with some extra lubricant in the box, the K1 does not. If you need to pick some up, we recommend Superlube 21030.
- Do not lubricate the X axis rod, it has a self lubricating bushing instead of bearings.