Welcome to 2004! So far; so good. We've just finished inventory, so now back to work for us! Things are on-track for the Sumovore Atmel and PIC brainboards, so stay tuned; we hope to have them available by the end of March. We're still working towards more content and features for both the Solarbotics.com and […]

Epilog Laser Problems/Solutions, New Pro...
Dave Hrynkiw
August 6, 2011
This week, we've had a lot of fun with our Epilog Laser. And by fun, I obviously mean "turmoil and general miserableness". Fortunately, we've sorted the issue out. What I'm going to do is chronicle our pains, describing the exact issue and solution, so that The Googles will index the knowledge for other explorers of the Internets to find, so that they can see a detailed solution. And while lasers are a lot of fun and a great piece of equipment, it's probably a safe bet that this mini-walkthrough/tutorial will be completely useless to the majority of you reading this on the Solarbotics front page. So without any delay, we'll get to the good stuff you all want to see - new products!
Probably the neatest of today's bunch is the Skitterbot. Well, I suppose 'neatest of the bunch' would be rather subjective, and I'm pretty sure the Solarbotics tech and all-around awesome dude, Jeremie, would first point to the Gameduino. But that's too bad, because I'm your Guide for Today's Tour of New Stuffs, and I think the Skitterbot is the neatest. And, well, I think Jeremie would say they're a close second anyways. But what the heck does it do? If only we had some kind of video to show it off...

")


- Skitterbot - This is the fastest legged robot commercially available, travelling at an amazing 1 foot per second!
- Arduarium Controller Basic (Assembled) - With sensors for pH and ORP, an RTC and hookups for many different types of peripherals all via USB, it's the perfect shield for your project.
- Gameduino VGA Adapter for Microcontrollers - Tiny microcontrollers like the Atmel AVR used in the Arduino are now much more powerful than the 8-bit computers from the 1980s. So why not use them to play video games?
- DPDT Slide Switch - Use this switch for reversing polarity, turning on/off 2 isolated circuits that you'd like to control at the same time, or parallel up the 2 sides for higher current applications.
- Infrared Remote Decoder Module - Receive and decode wireless infrared transmissions over a 38 kHz carrier wave, and easily interface to a microcontroller such as an Arduino with only 3 pins (Power, Ground, & TX).
- Mini USB & Bluetooth Interface GPS Demo Board - A GPS unit that comes with Bluetooth and and USB-TTL on board, plus an external magnetic antenna with a 9.5ft long cable that is all bundled together for a great price.
Ok, now on to the laser goodness - you can stop reading here if you just came for the latest in SB news. I'll detail two three four problems we've been having with our 60W Epilog Helix this past week, which may also prove interesting to those of you who are just plain curious about the nature of these things.
1. Laser Won't Fire
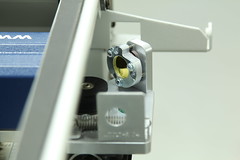
The first issue we've been trying to tackle is that the laser simply wouldn't fire at all. We'd load up a job, start the machine, and the head/arm would move like normal. The problem is that nothing would engrave or cut at all. We'd fiddle around with things, and sometimes it would start working. And just as mysteriously as it was fixed, it would break again. This turned out to be a wiring issue with the magnetic sensors on the doors. There are two doors on an Epilog Helix like ours - the top lid (which is a transparent window, and used the most - it's general access for adding/removing material) and the front vertical door (typically for maintenance, such as changing out the task plate). Both of these doors need to be closed in order to allow the laser to fire. This safety works via small, black magnetic sensors that are a part of the frame, while magnets are placed on the doors themselves. As soon as the door closes and the magnets are near enough, the safeties are activated (or deactivated, depending on how you want to look at it) and the laser will operate.
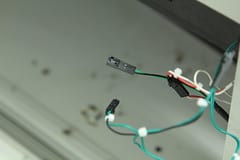 After popping off the right side of the laser, we had access to the motherboard. And near the center there are two LEDs - Lock 1 for the top door, and Lock 2 for the front door. Lock 2 would simply not turn on. After much tedious tracing of wires back and forth, testing individual connectors with multimeters, and sketching impromptu circuit diagrams, we found that it was the front far-left sensor that was having issues. We changed out the sensor itself which didn't make a difference - this narrowed the problem down to the wire harness between that sensor and the main cluster of sensor wires that go to the motherboard. We found the relevant connection, unplugged the male connector, and put a jumper into the female one. Lock 2 illuminated, and we were good to go. So until we get a replacement harness, the safety for the front door has been bypassed. Not ideal, but it lets us get work done. We figure that whenever there was a remotely significant jolt or bump to the laser, say from opening or closing the front door, it would nudge the faulty wire just so, and it would either stop working or start working again.

2. Fading Strength in Certain Areas
The second problem had to do with inconsistent cutting quality. One corner (in this case, the top left) would be much more faded than the rest of the bed, in terms of strength. We have many jobs we run regularly that take a full 24x18" sheet of acrylic, and we were finding that everywhere on the sheet was coming out as it should be, except for that top left position. It would ease in and out around the area, going from perfect, to weaker, until it wouldn't penetrate the material all the way. There was always an entrance mark - it was difficult to tell from the top of the sheet of plastic, but once it was flipped over it became immediately clear that the power was not being consistent. This could be compensated for, to a degree, by increasing the power/decreasing the speed for cuts. It would just barely go all the way through in the problem area, while everything else was getting overkill. It increased our job times and put unnecessary strain on the machine. What could be causing this? The table wasn't level and therefore not focused? A driver or firmware issue that would fluctuate the settings in one area? Airflow issues? None of them. It was a bit of dust collection on the optics.
 Which didn't make a whole lot of sense - why would it effect only one 2D region of the table, if the physical optics really only move in one axis relative to each other? Well, as it turns out, there is actually a bit of play with the laser beam in relation to the head of the laser itself. At the top-left position, the laser can be one or two millimeters away from where it would be than if it were in the lower-right corner. You can test this out yourself pretty easily - put a piece of masking tape directly under the lens on the head, and make a VERY brief and weak cut in the top-left corner (we did a 1mm circle at 100% speed and 20% power). This makes a mark on the tape, which will align with your pointer. Disable your X/Y lock and leave the pointer on, and move the head around the table. You'll notice how the pointer moves away from your initial reference mark, particularly when you're in the opposite corner of the bed. This is, apparently, quite normal. For a few millimeters, at least. What does this mean for drafting and production? Large pieces will not come out to be 100% accurate, but this margin is very small. So far, we've yet to do anything where this has had practical implications.
But back to the problem - what does this have to do with fading power in a single region? If you have some small accumulation dust on your lens or in your mirror, this location will partially obscure the laser itself when the head is in a certain 2D region. It may not be in the way for cutting withing the entire bed of the laser except when it lines up in the top left corner. The lesson here? Clean your optics. Thoroughly. Obsessively.
 There are four elements you need to be concerned with: the emitter, x-axis mirror, head mirror, and focusing lens. The emitter generally doesn't see a lot of action. We recently had an issue with our ventilation, and because the dust wasn't getting sucked out as it should have been, some of it got back there and the glass had to be cleaned. Epilog includes some lens cleaner with the laser, which we apply to a cotton swab/Q-tip and use to clean off most of the gunk. Plastic is generally a pretty nasty material in terms of buildup, so we usually clean off the head optics (mirror and lens) every three jobs. Every once in a while you come across something nasty, such as yesterday when we were having fading issues with the lower-right corner. Everything was cleaned as it should've been, but apparently a particularly small and nasty bit of nastiness had affixed itself to the lens. The standard cleaner didn't cut it, so we had to use straight-up white vinegar (you know, like the kind you put on fries. If you're Canadian, that is) to dissolve it a bit before it could be removed.

3 & 4. X-Axis Cogging, Fraying X-Axis Belt
Oh, and are you finding that the x-axis movement is cogging something fierce? Like you can't move it as freely as you remember, and it's kinda jumping/skipping horizontally? It may be time to clean the head of servo that drives the x-axis belt. It's located on the far right side - remove the panel, unscrew the motor mount, slip off the belt, and get in there with something hard and pointy. We find that the dust can really accumulate and solidify in there, so you have to scratch it out with something sharp. Once that's cleaned up, put the belt back on and re-seat the motor. Note: Make sure that the motor goes in the same way it came out. We found that, for some reason, the belt would occasionally creep up ever so slightly and rub against the metal, fraying the top.
So there you have it, our contribution to Epilog Helix operators everywhere, and "more useless information than I needed to know" for the rest of you. Hopefully The Googles will pick this out of the heap and deliver it to you in a time of need and desperate searching.
MORE POSTS
Closed for Thanksgiving (Monday October ...
Being in Canada, October is practically the doorstep of winter. Some places get a full three months of autumn, but for us it's one big multicolored blur before everything gets covered in white. Sure, that means that winter takes up half the year. But do you know what it also means? Thanksgiving comes almost a […]
Sumovore PIC Brainboard
Wheee! It's finally outta my hair - the Sumovore PIC Brainboard now available to all you microcontroller fans that insist on programmable robots. Complete with a 5 pin and RJ11-6 port, you can use practically all PIC programming tools and hardware (or build your own programming cable as detailled in the instruction) to put your […]
GM19 Gearmotors in action!
We've had a great email come in from "Team Wazio", who are using our GM19 gear motors in their ant/fairyweight battlebots. Neat construction details - worth a look-see! (Yes, we know they're using the RW2 wheels and we're sold out, but we're taking care of that...)
Solarbotics has been operating for more than 25 years, bringing electronics know-how and supplies to both the electronics professional and hobbyist. We'll be happy to help you too!
Solarbotics, Ltd. is not responsible for misprints or errors on product prices or information. For more information, please see our Terms and Conditions.
Warning: This product contains chemicals known to the State of California to cause cancer and birth defects or other reproductive harm.
Please visit www.P65Warnings.ca.gov for more information. This item was manufactured prior to August 31, 2018.